

Post by StormHunter on May 11, 2016 18:30:43 GMT
Power Management
(This section is out of date due to changes in the game, i will update it later to fit current conditions, however the majority of the advise is valid still.)
When your ship gets damaged during a battle, how your Ships AI responds to the damage is the difference between winning or losing. So when we think about power, we have to prioritize.
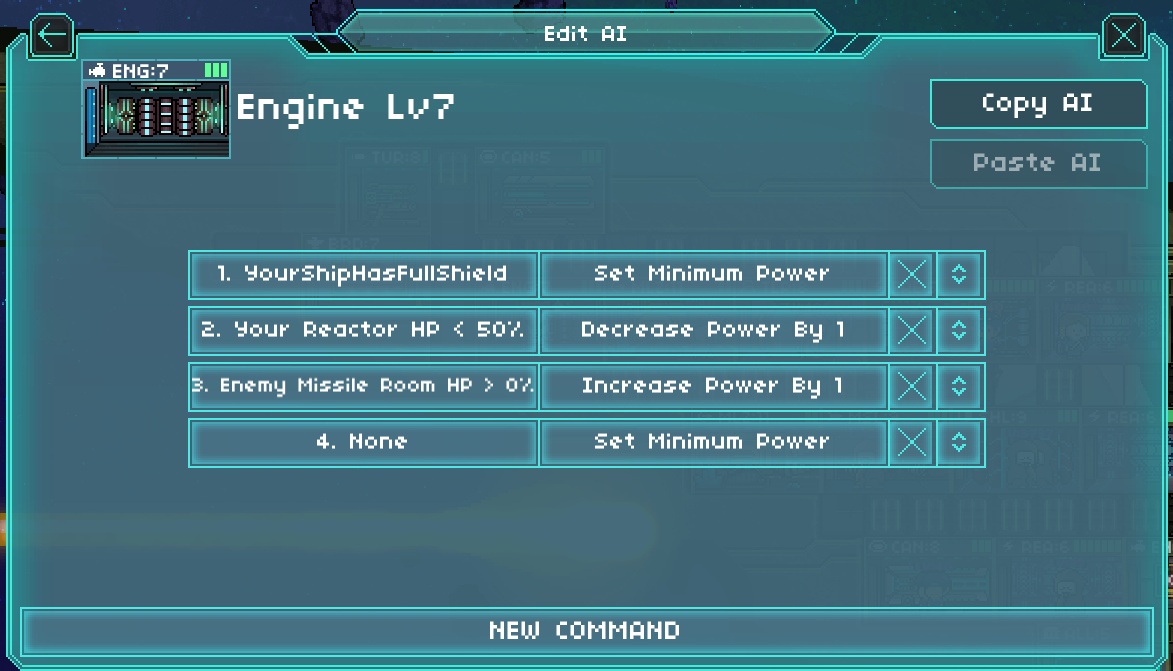
Engine Emergency Cutoff: Your Engines are power hungry (3 energy each) but have pretty low efficiency(18% Missile Dodge each at max level) (patch has upgraded engines). So while I do recommend having them, if your ships reactors are damaged, they should be the first things to power down.

In the command list above, you see that the Engine will start powering down when the reactor takes heavy damage, and only powers up if the enemy has active missile rooms.
Engine Backup & Delayed Power up: What if your struggling for power? You want to only run 1 engine at a time or you want them to power up last so power can go to more vital systems? Try one or both of the following sets of commands!
Ok so Engine "A" will stay powered down till the first laser strike to your shields (this is to help with low power situations, the engine is set up to take power last (Resulting it working with reduced power if the ship only had 1 or 2 power left to give after powering more important rooms). It will then power up with any remaining power if the enemy has missile launchers. It will power down if a generator is severely damaged or if the enemy missile launchers are destroyed.
Engine "B" is the backup engine, it will only kick in if engine A is under 50% health (its probably dead then). it will power down if engine A is repaired. This is how you can make a back up engine as well as conserve power !

Weapons: (Sip not gulp) I believe that 2 reduced power lasers are better than 1 full power laser. Having them fighting each other to gulp full power can result in losing charged shot and a list of other problems I won’t go into here.
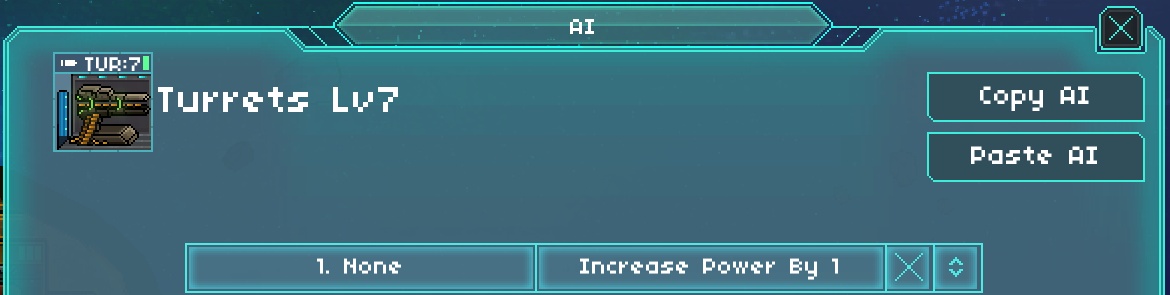
That’s all.. not much to it. just telling them all to power up by one lets them equally distribute power and offers the best flexibility in combat.
Teleporter: Powering your teleporter comes down to when you use it. I use mine to do 2 different tasks (and you see them reflected in the command list)
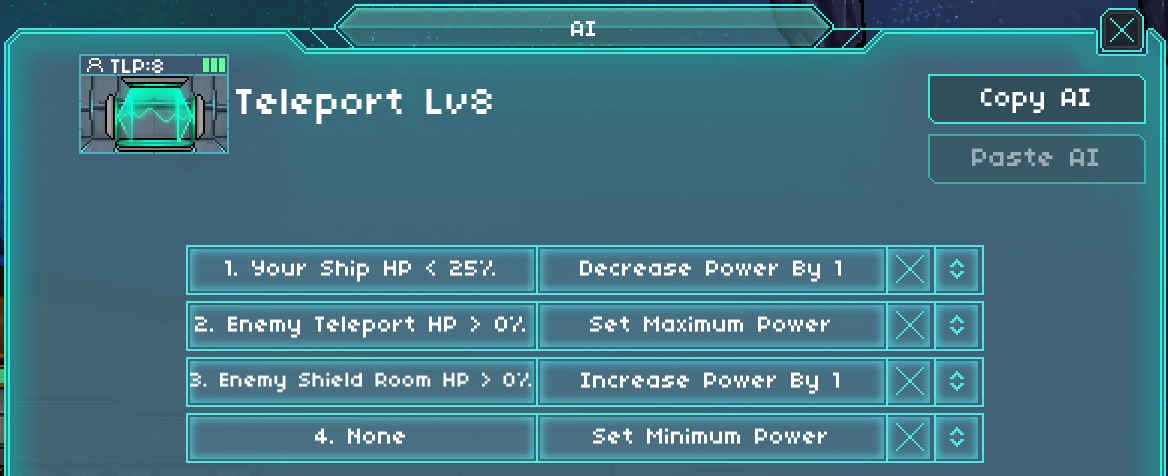
My first team targets the enemy teleporter. Then later in the battle my second team targets the enemy shield. If both targets are eliminated or my ship falls below 25% health my teleporter will power down. However, if you don’t use the teleporter as heavily as I do you might want to treat it like an engine and power it down if you receive reactor damage.
Ship Targeting AI
Ship targeting used to have some grace to it. Now with ship level 10 the most effective strategy is to concentrate fire on one room to win. But I will list some other strategies for members who are not at the 10v10 level yet or want to swap strategies. You can skip to the bottom for the good 10v10 command.
Targeting the Reactors
The most popular strategy for players under 2000 trophies. This basic AI command simply targets any Reactor on the enemy ship until they all are destroyed. When it has no further commands to follow it will continue to shoot at the last reactor it was targeting causing hull damage.
Advantage: Reactors are the life blood of the ship, As they die they have ship wide effects on the enemy shields and weapons.
Disadvantage: Everyone knows to defend their generators mid/late game, Due to their High HP and multiple locations (4 separate High HP rooms) they are hard to destroy quickly, as enemy AI will repair them and some ships keep them armored.
Targeting Shields
Also a very popular strategy for mid game 1500-3000 trophies. This basic AI command simply targets 1 room.. the Shield Generator. Since there is no commands to target anything else, the weapons will continue to fire on it.
Advantage: Shields offer a single room to concentrate fire on for the most effect. You destroy their primary defense and start doing hull damage very early into the battle.
Disadvantage: Everyone knows to defend their shield generator mid /late game, Its pretty common to see the room have the majority of the crew ordered to repair it and for it to be armored with 4-6 blocks of armor. (Read our armor post to understand how armor can severally diminish the hull damage you do.)
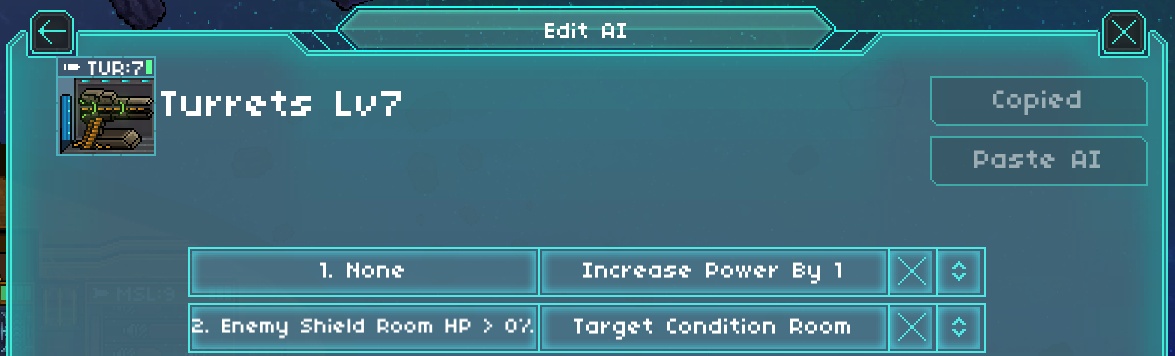
Targeting Multiple (Basic)
A strategy used by some to target multiple targets. These AI commands will result in the shield generator then weapons being destroyed. If the shield generator is repaired targeting will swap back to it. (You might have noticed the reactors are not targeted.. targeting them in this situation is pointless. As you destroy systems you are technically giving the enemy ship extra power, why would you then waist time destroying reactors for no effect?)

Advantage: You destroy the shields and then focus on the weapons, it’s a very systematic strategy for disabling the enemy ship. It mostly avoids having the shield room as the final target for hull damage, as its usually well armored.
Disadvantage: You still need to deal with the crews efforts to repair the shield generator and then you also waist time targeting multiple other rooms. This can result in your ship shooting to no effect as multiple rooms are repaired and your AI trys to target them all. By the time you start to do real hull damage, the enemy ship may have destroyed your ship!
Targeting Multiple [V2] (Advanced)
This was my old targeting method using smarter AI commands. It avoids some of the major problems with the previous method. It takes a couple of factors into account: Laser and projectile fire has to overpower your shields. (I keep my shield room fully staffed and use many of the defensive AI tactics I posted on the forum.) If I destroy 2/3 of the enemy weapons, my shield can cover the rest. Also missile damage has been significantly reduced by a well armored design so they have little effect when not paired with laser/projectile fire.
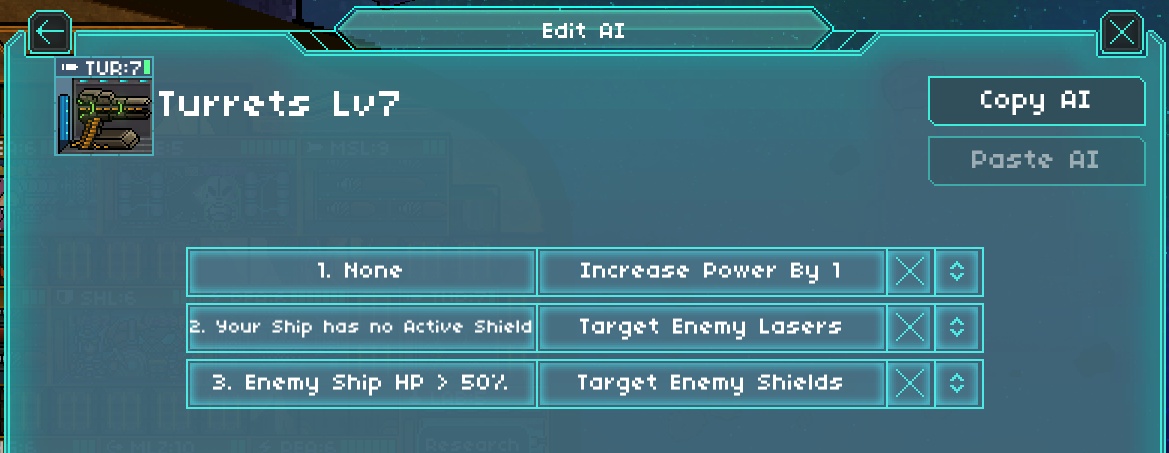
Advantage: If your shields are up, the enemy shields are targeted. My primary goal here is to get a few potshots into the enemy shield room to kill the crew manning it. (I used to also use anti crew missiles into the room) My shields would eventually fail to enemy weapons fire and my AI would then swap over to target lasers. As the shields go up and down the AI will swap fire between the two room types. If the shield room is destroyed the AI will swap and stay on a laser target till the ship is destroyed. This method can result in a win without waiting time targeting missiles or every single laser (if your shields come back up and can handle the remaining enemy weapons fire) your ship will not swap targets to another laser but continue to target the destroyed a single target for hull damage.
Disadvantage: The reason I can’t use this strategy anymore is that my shield advantage I once enjoyed is gone at ship level 10 due to the sheer amount of weaponry and power the update added. The next method below is sadly the best way to win when you gain ship level 10 and upgrade your 2nd plasma cannon. However this targeting method might be a great fit for ships that haven't reached level 10 yet.
The follow AI command is gold.. Only top players with a strong understanding of AI commands have figured it out and it’s been somewhat hoarded.. (I’m guilty of this too) But the secrets mostly out now, and so we will share it with all trusted members (2 black stars and above)
Targeting a Single Room [V3]
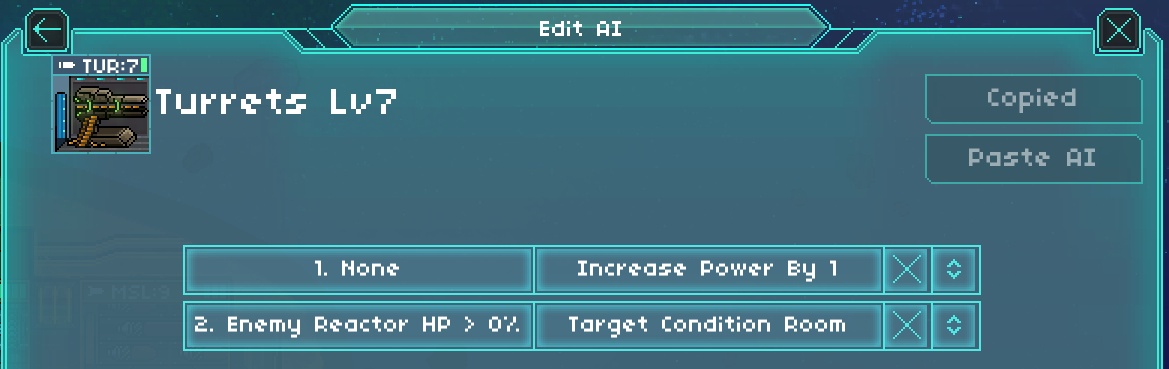
How the AI works is that if the condition OR the action is no longer possible the command will not be followed.. it will be skipped. We take advantage of our strong understanding of AI commands by giving the AI a list of commands it can only carry out once during the battle. When targeting a single room, you have no choice which room of that room type the AI targets. But whatever room it targets on that particular ship, it will target again. So if you told it to target lasers it will pick a laser to fire at and simply continue to fire at it..

In my example I list multiple rooms but only one will ever be targeted. In the example above I pick teleporter first, then engines, then lasers. (you can change the order to best fit the situation your in, but the goal is to have your AI target a room which has low armor and or low life) The reason i list so many targets is if I didn’t list multiple rooms and only listed the teleporter for example.. and i fought someone without a teleporter... my ship would not fire at anything! So you should list multiple targets for the AI to pick from in the order that best works for your ranking, then end it with "random room" as a failsafe.
*This AI will not work when your upgrading your shields!! you should switch to the "Enemy Shields are Full" version temporarily!!*
Advantage: You fire everything you have into 1 room, it’s a hull damage blitz!
Disadvantage: You might fire into the most armored room on the ship.. oops.
-StormHunter
(This section is out of date due to changes in the game, i will update it later to fit current conditions, however the majority of the advise is valid still.)
When your ship gets damaged during a battle, how your Ships AI responds to the damage is the difference between winning or losing. So when we think about power, we have to prioritize.
Engine Emergency Cutoff: Your Engines are power hungry (3 energy each) but have pretty low efficiency
In the command list above, you see that the Engine will start powering down when the reactor takes heavy damage, and only powers up if the enemy has active missile rooms.
Engine Backup & Delayed Power up: What if your struggling for power? You want to only run 1 engine at a time or you want them to power up last so power can go to more vital systems? Try one or both of the following sets of commands!
Ok so Engine "A" will stay powered down till the first laser strike to your shields (this is to help with low power situations, the engine is set up to take power last (Resulting it working with reduced power if the ship only had 1 or 2 power left to give after powering more important rooms). It will then power up with any remaining power if the enemy has missile launchers. It will power down if a generator is severely damaged or if the enemy missile launchers are destroyed.
Engine "B" is the backup engine, it will only kick in if engine A is under 50% health (its probably dead then). it will power down if engine A is repaired. This is how you can make a back up engine as well as conserve power !
Weapons: (Sip not gulp) I believe that 2 reduced power lasers are better than 1 full power laser. Having them fighting each other to gulp full power can result in losing charged shot and a list of other problems I won’t go into here.
That’s all.. not much to it. just telling them all to power up by one lets them equally distribute power and offers the best flexibility in combat.
Teleporter: Powering your teleporter comes down to when you use it. I use mine to do 2 different tasks (and you see them reflected in the command list)
My first team targets the enemy teleporter. Then later in the battle my second team targets the enemy shield. If both targets are eliminated or my ship falls below 25% health my teleporter will power down. However, if you don’t use the teleporter as heavily as I do you might want to treat it like an engine and power it down if you receive reactor damage.
Ship Targeting AI
Ship targeting used to have some grace to it. Now with ship level 10 the most effective strategy is to concentrate fire on one room to win. But I will list some other strategies for members who are not at the 10v10 level yet or want to swap strategies. You can skip to the bottom for the good 10v10 command.
Targeting the Reactors
The most popular strategy for players under 2000 trophies. This basic AI command simply targets any Reactor on the enemy ship until they all are destroyed. When it has no further commands to follow it will continue to shoot at the last reactor it was targeting causing hull damage.
Advantage: Reactors are the life blood of the ship, As they die they have ship wide effects on the enemy shields and weapons.
Disadvantage: Everyone knows to defend their generators mid/late game, Due to their High HP and multiple locations (4 separate High HP rooms) they are hard to destroy quickly, as enemy AI will repair them and some ships keep them armored.
Targeting Shields
Also a very popular strategy for mid game 1500-3000 trophies. This basic AI command simply targets 1 room.. the Shield Generator. Since there is no commands to target anything else, the weapons will continue to fire on it.
Advantage: Shields offer a single room to concentrate fire on for the most effect. You destroy their primary defense and start doing hull damage very early into the battle.
Disadvantage: Everyone knows to defend their shield generator mid /late game, Its pretty common to see the room have the majority of the crew ordered to repair it and for it to be armored with 4-6 blocks of armor. (Read our armor post to understand how armor can severally diminish the hull damage you do.)
Targeting Multiple (Basic)
A strategy used by some to target multiple targets. These AI commands will result in the shield generator then weapons being destroyed. If the shield generator is repaired targeting will swap back to it. (You might have noticed the reactors are not targeted.. targeting them in this situation is pointless. As you destroy systems you are technically giving the enemy ship extra power, why would you then waist time destroying reactors for no effect?)
Advantage: You destroy the shields and then focus on the weapons, it’s a very systematic strategy for disabling the enemy ship. It mostly avoids having the shield room as the final target for hull damage, as its usually well armored.
Disadvantage: You still need to deal with the crews efforts to repair the shield generator and then you also waist time targeting multiple other rooms. This can result in your ship shooting to no effect as multiple rooms are repaired and your AI trys to target them all. By the time you start to do real hull damage, the enemy ship may have destroyed your ship!
Targeting Multiple [V2] (Advanced)
This was my old targeting method using smarter AI commands. It avoids some of the major problems with the previous method. It takes a couple of factors into account: Laser and projectile fire has to overpower your shields. (I keep my shield room fully staffed and use many of the defensive AI tactics I posted on the forum.) If I destroy 2/3 of the enemy weapons, my shield can cover the rest. Also missile damage has been significantly reduced by a well armored design so they have little effect when not paired with laser/projectile fire.
Advantage: If your shields are up, the enemy shields are targeted. My primary goal here is to get a few potshots into the enemy shield room to kill the crew manning it. (I used to also use anti crew missiles into the room) My shields would eventually fail to enemy weapons fire and my AI would then swap over to target lasers. As the shields go up and down the AI will swap fire between the two room types. If the shield room is destroyed the AI will swap and stay on a laser target till the ship is destroyed. This method can result in a win without waiting time targeting missiles or every single laser (if your shields come back up and can handle the remaining enemy weapons fire) your ship will not swap targets to another laser but continue to target the destroyed a single target for hull damage.
Disadvantage: The reason I can’t use this strategy anymore is that my shield advantage I once enjoyed is gone at ship level 10 due to the sheer amount of weaponry and power the update added. The next method below is sadly the best way to win when you gain ship level 10 and upgrade your 2nd plasma cannon. However this targeting method might be a great fit for ships that haven't reached level 10 yet.
The follow AI command is gold.. Only top players with a strong understanding of AI commands have figured it out and it’s been somewhat hoarded.. (I’m guilty of this too) But the secrets mostly out now, and so we will share it with all trusted members (2 black stars and above)
Targeting a Single Room [V3]
How the AI works is that if the condition OR the action is no longer possible the command will not be followed.. it will be skipped. We take advantage of our strong understanding of AI commands by giving the AI a list of commands it can only carry out once during the battle. When targeting a single room, you have no choice which room of that room type the AI targets. But whatever room it targets on that particular ship, it will target again. So if you told it to target lasers it will pick a laser to fire at and simply continue to fire at it..
In my example I list multiple rooms but only one will ever be targeted. In the example above I pick teleporter first, then engines, then lasers. (you can change the order to best fit the situation your in, but the goal is to have your AI target a room which has low armor and or low life) The reason i list so many targets is if I didn’t list multiple rooms and only listed the teleporter for example.. and i fought someone without a teleporter... my ship would not fire at anything! So you should list multiple targets for the AI to pick from in the order that best works for your ranking, then end it with "random room" as a failsafe.
*This AI will not work when your upgrading your shields!! you should switch to the "Enemy Shields are Full" version temporarily!!*
Advantage: You fire everything you have into 1 room, it’s a hull damage blitz!
Disadvantage: You might fire into the most armored room on the ship.. oops.
-StormHunter


