

Tactics: Crew AI Teleporter Tactics [V1] *Restored*
Jun 15, 2016 16:28:44 GMT
Zzui, mishutkas, and 2 more like this
Post by StormHunter on Jun 15, 2016 16:28:44 GMT
Before we dive into this, let me point out a few things to keep in mind
Key Aspects:
(Please Review basic Teleporter info here if your not familiar with all its rules)
Primary Teleporter Crew: Your best crew, dedicated to boarding! Should be the first onto the enemy ship! (We recommend 2 Primary)
Secondary Teleporter Crew: Doing multiple tasks, will teleport after conditions are met by the AI. (We recommend 1 Secondary)
Crew Stats: Boarding crews need High HP and High Attack! Here are some "good" numbers to look for in crew you pick as boarders. (higher of each the better! mix and match!)
10HP and 3 Attack
9HP and 2.7 Attack
8HP and 2.4 Attack
7HP and 2 Attack
6HP and 1.7 Attack
Order of Teleport: Crew teleport based on the order in which they reach the teleporter pad! Move crew into nearby rooms to time their arrivals.
Primary Order: Your highest HP "Primary" should teleport first, your highest Attack "Primary" should teleport second.
Basic Attack
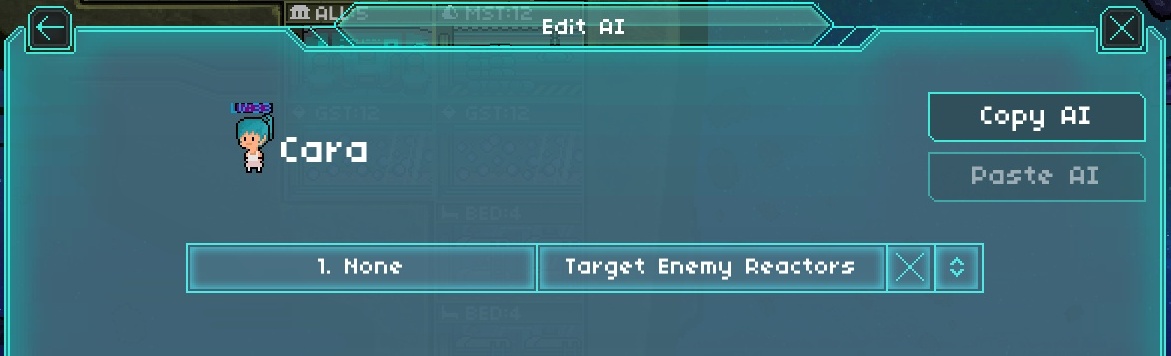
*Primary Teleporter Crew AI*
What Happens?: The boarder will teleport directly to an enemy reactor and try and destroy it. If they are successful, they will move onto the next reactor (if its reachable by walking) Otherwise if no reactor is reachable by walking they will stay in the destroyed room until the end of the battle.
When to use it: This AI is simple and can be used to target critical systems. However, if you aim it at a teleporter or engines be sure to add additional targets! (in case the ship you're fighting lacks one of these non critical system.. otherwise the AI might not do anything!) We just put this command up as a reference point on what a basic AI would do... We recommend using one of the more complex AI's listed below.
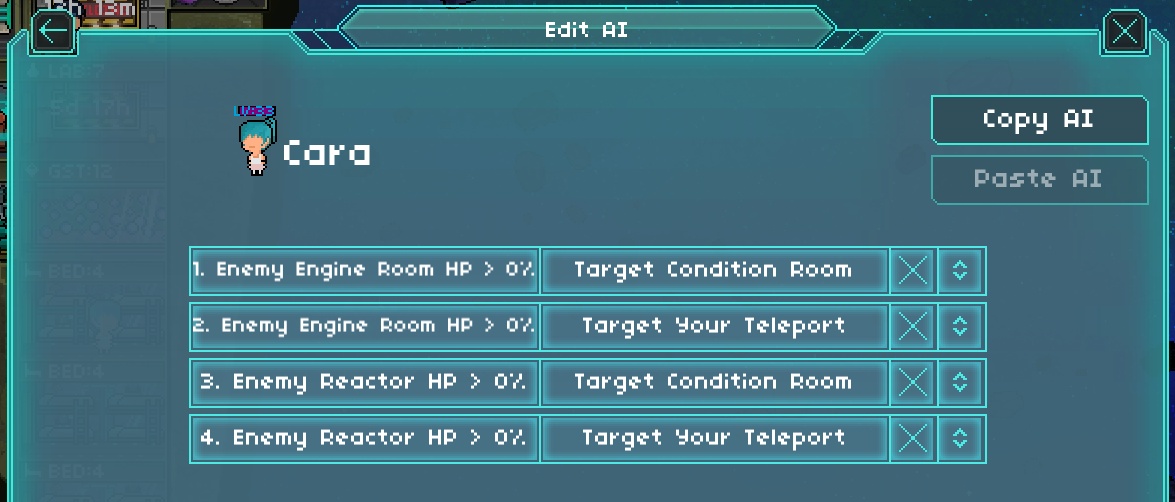
Anti-segmented Ship AI

*Primary Teleporter Crew AI*
What Happens?: We duplicated the "trigger" (command 1,2) in this example its "Enemy Reactor HP > 0%" So just like before the boarder will teleport directly to an enemy reactor and try and destroy it... If they are successful, they will move onto the next reactor if they can walk to it.. but! what if its a segmented ship and the boarder cant walk to it? the Basic Attack AI would have just stood there.. But this AI will now follow its command "2" and teleport back to your teleporter! Then command "1" will take effect again and they will teleport to the next functional reactor. After all reactors are destroyed the "trigger" is no longer in effect and the crew member will stay in the last destroyed reactor.. until an enemy reactor is repaired or the battle ends.
When to use it: This is honestly an intermediate players basic attack.. It is a very useful command to implement mixed with other AI commands or even on its own.. you can actually multi target with it as well. If for example you had selected "engine HP >0%" as triggers for 1 and 2.. you could follow it up with the "Reactor HP>0%" as triggers for command 3,4 and it will work perfectly fine!
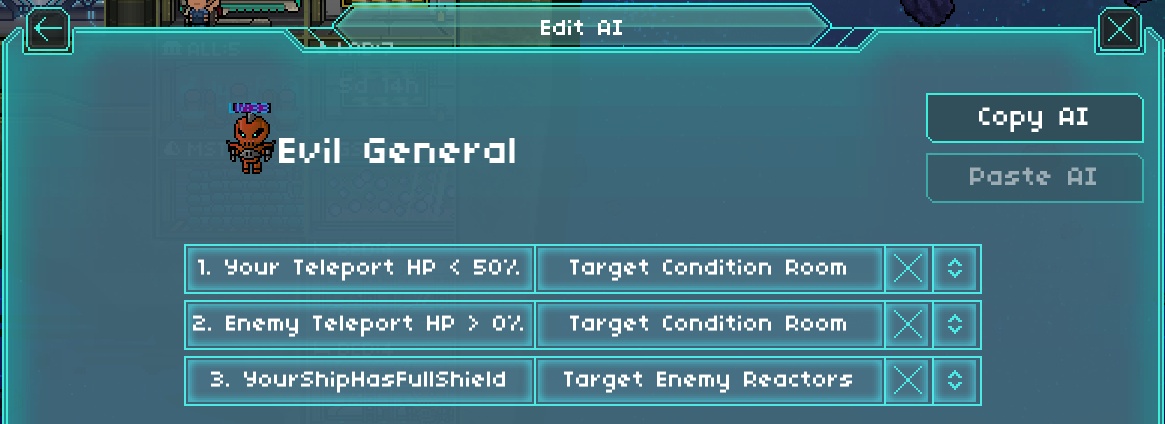
Basic Room Hold

*Primary Teleporter Crew AI*
What Happens?: We are actually using 2 different commands to achieve the same goal here. The first command to attack the teleporter is a "basic" attack but will result in a room hold (the crew member will stay in the room he originally boards to try and kill any repair teams). This is possible because the second command is extremely conditional. So if command 1 is followed, command 2 will expire and wont trigger. However, if command 1 is skipped (the enemy had no teleporter) Command 2 will trigger causing a room hold in a reactor room.
When to use it: This is an amazing AI command when its successful. using it with your 2 primary boarders might be enough to kill every repair team on an enemy connected ship. This command however is the basic version, eventually you will want to script your crew to move on and kill other rooms!
Fail Safe
*Primary or Secondary Teleporter Crew AI*
What Happens?: Pretty basic command that makes your crew defend the teleporter room when its attacked and heavy damaged.
When to use it: I don't really recommend doing this, i think you should defend the room with your secondary teleporter crew and let your primary team focus on the enemy! If your teleporter is heavy damaged or destroyed mid battle, your crew might end up returning to the teleporter and giving up a room hold they had set up! Also if the enemy ship is targeting your teleporter, it will wreck havoc on your AI and get your boarding crew killed!
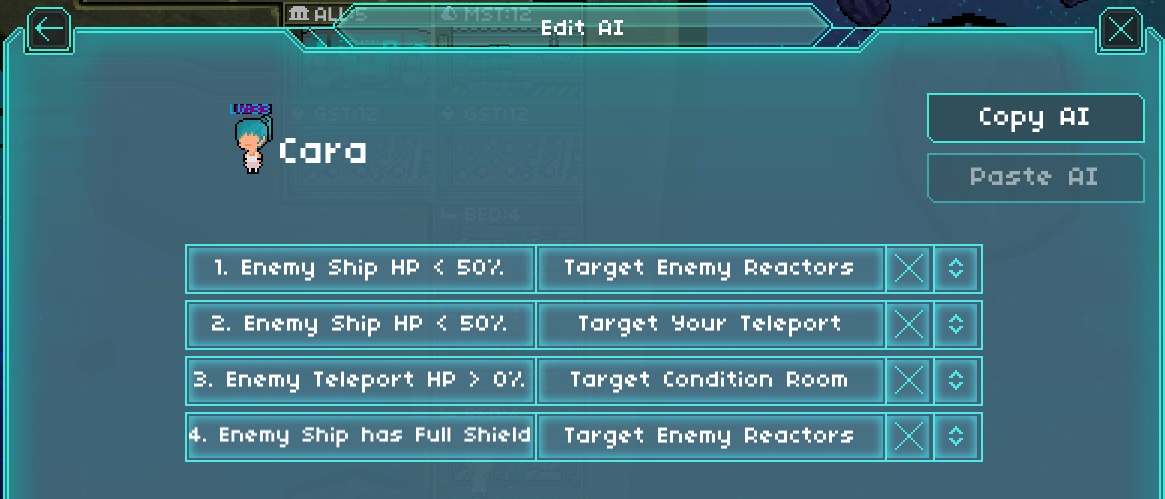
Room Hold & 2x Mid-Battle Scatter

*Primary Teleporter Crew AI*
What Happens?: We added to "Basic Room Hold" by giving the boarder two "Ship HP" commands to trigger the "Mid-Battle Scatter". Now if either ship falls below 50% health, the boarder will drop its room hold and start to attack any nearby reactors. (We could also implement anti segmented AI to this, but i didn't want to get to complicated to fast)
When to use it: Room hold works better with a scatter command, your goal is to kill repair teams first, then cause even more damage to the enemy ship! you see me using reactors as targets here, but you can modify it to whatever you like.
Room Hold & 1x Mid-Battle Scatter & Anti-segmented Ship AI
*Primary Teleporter Crew AI*
What Happens?: A variation on the Room hold and mid battle scatter. When using the scatter command you could split the scatter between the 2 primary boarders. Boarder "one" could scatter as seen here, (when the enemy ship falls under 50%) They not only would scatter, they would also implement the Anti Segmented AI! Boarder 2 could be set to scatter on your ship falling below 50%.
When to use it: I prefer to split the scatter command between my two boarder because of elevator bottle necks. When my crew takes an enemy room, sometimes multiple enemy crew try to respond but get bottle necked by a lift! this makes them trickle in over a long period of time, which would create a situation where both my boarders would have scattered before killing all the repair crews! In addition this also would stop my own crew scattering together and getting stuck waiting for that very same lift! This method allows one crew member to go and one to stay, mitigating both problems!
Emergency Teleport! & Flan B!
*Primary Teleporter Crew AI*
What Happens?: So in this command list we are using 2 different HP triggers.
The first trigger, command "1" will be the Emergency Teleport! command. Your crew member is about to die, so he teleports back and mans a gun! This is a really good choice if you have pretty weak boarders right now. Not only will they live to gain XP during the battle, but they still function at 100% manning a room!
The next HP command is command "2" and "3". This is "Flan B!" (named in honor of puddings plan to save the alliance) So this triggers when your crew member teleports into an occupied room and receives some damage (HP<50 or HP<100), he will flee to (in this example) the enemy engine room (or teleport back to your ship and teleport to the engine room as we included the Anti Segmented AI.) He will hopefully find the room unoccupied!
When to use it: These commands are best for lower level boarding crews. You gain the ability to save the crew member's life so they can gain XP during victory and are able to still serve the ship by manning a weapon! (even with 25% health they will work at 100%!) If you have high level boarders however, you should go all in and not use these commands! High level boarding is razor thin margins for victory, so boarders must be willing to fight to the death!
Will write up some secondary teleporter crew commands later! as well as add in an experimental "jumping" AI that faxima demonstrated once. good hunting!
-StormHunter
Key Aspects:
(Please Review basic Teleporter info here if your not familiar with all its rules)
Primary Teleporter Crew: Your best crew, dedicated to boarding! Should be the first onto the enemy ship! (We recommend 2 Primary)
Secondary Teleporter Crew: Doing multiple tasks, will teleport after conditions are met by the AI. (We recommend 1 Secondary)
Crew Stats: Boarding crews need High HP and High Attack! Here are some "good" numbers to look for in crew you pick as boarders. (higher of each the better! mix and match!)
10HP and 3 Attack
9HP and 2.7 Attack
8HP and 2.4 Attack
7HP and 2 Attack
6HP and 1.7 Attack
Order of Teleport: Crew teleport based on the order in which they reach the teleporter pad! Move crew into nearby rooms to time their arrivals.
Primary Order: Your highest HP "Primary" should teleport first, your highest Attack "Primary" should teleport second.
Basic Attack
*Primary Teleporter Crew AI*
What Happens?: The boarder will teleport directly to an enemy reactor and try and destroy it. If they are successful, they will move onto the next reactor (if its reachable by walking) Otherwise if no reactor is reachable by walking they will stay in the destroyed room until the end of the battle.
When to use it: This AI is simple and can be used to target critical systems. However, if you aim it at a teleporter or engines be sure to add additional targets! (in case the ship you're fighting lacks one of these non critical system.. otherwise the AI might not do anything!) We just put this command up as a reference point on what a basic AI would do... We recommend using one of the more complex AI's listed below.
Anti-segmented Ship AI
*Primary Teleporter Crew AI*
What Happens?: We duplicated the "trigger" (command 1,2) in this example its "Enemy Reactor HP > 0%" So just like before the boarder will teleport directly to an enemy reactor and try and destroy it... If they are successful, they will move onto the next reactor if they can walk to it.. but! what if its a segmented ship and the boarder cant walk to it? the Basic Attack AI would have just stood there.. But this AI will now follow its command "2" and teleport back to your teleporter! Then command "1" will take effect again and they will teleport to the next functional reactor. After all reactors are destroyed the "trigger" is no longer in effect and the crew member will stay in the last destroyed reactor.. until an enemy reactor is repaired or the battle ends.
When to use it: This is honestly an intermediate players basic attack.. It is a very useful command to implement mixed with other AI commands or even on its own.. you can actually multi target with it as well. If for example you had selected "engine HP >0%" as triggers for 1 and 2.. you could follow it up with the "Reactor HP>0%" as triggers for command 3,4 and it will work perfectly fine!
Basic Room Hold
*Primary Teleporter Crew AI*
What Happens?: We are actually using 2 different commands to achieve the same goal here. The first command to attack the teleporter is a "basic" attack but will result in a room hold (the crew member will stay in the room he originally boards to try and kill any repair teams). This is possible because the second command is extremely conditional. So if command 1 is followed, command 2 will expire and wont trigger. However, if command 1 is skipped (the enemy had no teleporter) Command 2 will trigger causing a room hold in a reactor room.
When to use it: This is an amazing AI command when its successful. using it with your 2 primary boarders might be enough to kill every repair team on an enemy connected ship. This command however is the basic version, eventually you will want to script your crew to move on and kill other rooms!
Fail Safe
*Primary or Secondary Teleporter Crew AI*
What Happens?: Pretty basic command that makes your crew defend the teleporter room when its attacked and heavy damaged.
When to use it: I don't really recommend doing this, i think you should defend the room with your secondary teleporter crew and let your primary team focus on the enemy! If your teleporter is heavy damaged or destroyed mid battle, your crew might end up returning to the teleporter and giving up a room hold they had set up! Also if the enemy ship is targeting your teleporter, it will wreck havoc on your AI and get your boarding crew killed!
Room Hold & 2x Mid-Battle Scatter
*Primary Teleporter Crew AI*
What Happens?: We added to "Basic Room Hold" by giving the boarder two "Ship HP" commands to trigger the "Mid-Battle Scatter". Now if either ship falls below 50% health, the boarder will drop its room hold and start to attack any nearby reactors. (We could also implement anti segmented AI to this, but i didn't want to get to complicated to fast)
When to use it: Room hold works better with a scatter command, your goal is to kill repair teams first, then cause even more damage to the enemy ship! you see me using reactors as targets here, but you can modify it to whatever you like.
Room Hold & 1x Mid-Battle Scatter & Anti-segmented Ship AI
*Primary Teleporter Crew AI*
What Happens?: A variation on the Room hold and mid battle scatter. When using the scatter command you could split the scatter between the 2 primary boarders. Boarder "one" could scatter as seen here, (when the enemy ship falls under 50%) They not only would scatter, they would also implement the Anti Segmented AI! Boarder 2 could be set to scatter on your ship falling below 50%.
When to use it: I prefer to split the scatter command between my two boarder because of elevator bottle necks. When my crew takes an enemy room, sometimes multiple enemy crew try to respond but get bottle necked by a lift! this makes them trickle in over a long period of time, which would create a situation where both my boarders would have scattered before killing all the repair crews! In addition this also would stop my own crew scattering together and getting stuck waiting for that very same lift! This method allows one crew member to go and one to stay, mitigating both problems!
Emergency Teleport! & Flan B!
*Primary Teleporter Crew AI*
What Happens?: So in this command list we are using 2 different HP triggers.
The first trigger, command "1" will be the Emergency Teleport! command. Your crew member is about to die, so he teleports back and mans a gun! This is a really good choice if you have pretty weak boarders right now. Not only will they live to gain XP during the battle, but they still function at 100% manning a room!
The next HP command is command "2" and "3". This is "Flan B!" (named in honor of puddings plan to save the alliance) So this triggers when your crew member teleports into an occupied room and receives some damage (HP<50 or HP<100), he will flee to (in this example) the enemy engine room (or teleport back to your ship and teleport to the engine room as we included the Anti Segmented AI.) He will hopefully find the room unoccupied!
When to use it: These commands are best for lower level boarding crews. You gain the ability to save the crew member's life so they can gain XP during victory and are able to still serve the ship by manning a weapon! (even with 25% health they will work at 100%!) If you have high level boarders however, you should go all in and not use these commands! High level boarding is razor thin margins for victory, so boarders must be willing to fight to the death!
Will write up some secondary teleporter crew commands later! as well as add in an experimental "jumping" AI that faxima demonstrated once. good hunting!
-StormHunter


